Deploy the Travellbuddy application and APIs
In this exercise, you will deploy the TravelBuddy website as a Single Page web Application (SPA) on S3. You will then implement a chatbot that registered users can use to have natural-language dialogue with your microservices in order to find information about flights.
- Download the source code bundle from TravelBuddy.zip and explode the zip file onto your filesystem. We will come back to this bundle in a later step, after we have created and downloaded the SDKs for each of the microservices.
The SPA implementation you have been provided has stubbed-out implementations of the three APIs we want to expose to our users. They have just enough implementation to not cause an error on the page when executed, but they do not provide any data. In order to ‘wire up’ our APIs to the SPA, we will need to implement the microservices, deploy them to AWS Lambda, create an API endpoint for each and generate the Javascript client SDKs that relate to these APIs. You completed this task in the previous module and it is not necessary for you to wire up all the microservices for this lab, but you could do so if you wish to practice the steps. If you do wire up all the microservices, then you will have a fully-working TravelBuddy website, complete with Flight Services, Hotel Services and Trip Services searching, and also a chat bot for natural language queries - ready to ship!
If you prefer to skip the creation of the microservices, skip ahead to Update the TravelBuddy SPA configuration.
Build and deploy the microservices
In this step, you will use the AWS CLI and CloudFormation/SAM to deploy the microservices. By using CloudFormation/SAM, many of the manual steps will be taken care of for you, streamlining the deployment process. You will still have to manually trigger the process, but the actual deployment will be automated.
The HotelSpecials và FlightSpecials microservices need to access a MySQL database to retrieve the hotel specials data. The lab environment has automatically deployed and seeded a database for you, and the connection details are provided Cloudformation Outputs tab with instructions below on where to update the placeholder in the template you will use to deploy the microservice. The MySQL instance has been deployed using Amazon RDS and is not publicly-accessible since it is launched in a private subnet. Therefore, for the Lambda functions to be able to connect to the database, the Lambda functions will also need to be deployed into a private subnet by enabling VPC Integration. The template.yml file provided for both these services has all the required setup to do this, you just need to update the placeholders as per the below instructions.
For both the HotelSpecials and FlightSpecials microservices do the following:
- Download the source code bundle from HotelSpecials.zip and FlightSpecials.zip and explode the zip files onto your filesystem.
- In a terminal window, cd into the filesystem locations where you exploded the source code, and build the deployment artefact by issuing the following command:
mvn package shade:shade
- Locate the file template.yml in the source code folder(s), and open it in a text editor such as Eclipse. Search/Replace the following placeholders with the actual values fromCloudformation Outputs tab:
- DatabaseSecurityGroup
- DatabaseSubnet1
- DatabaseSubnet2
- RDSEndpoint
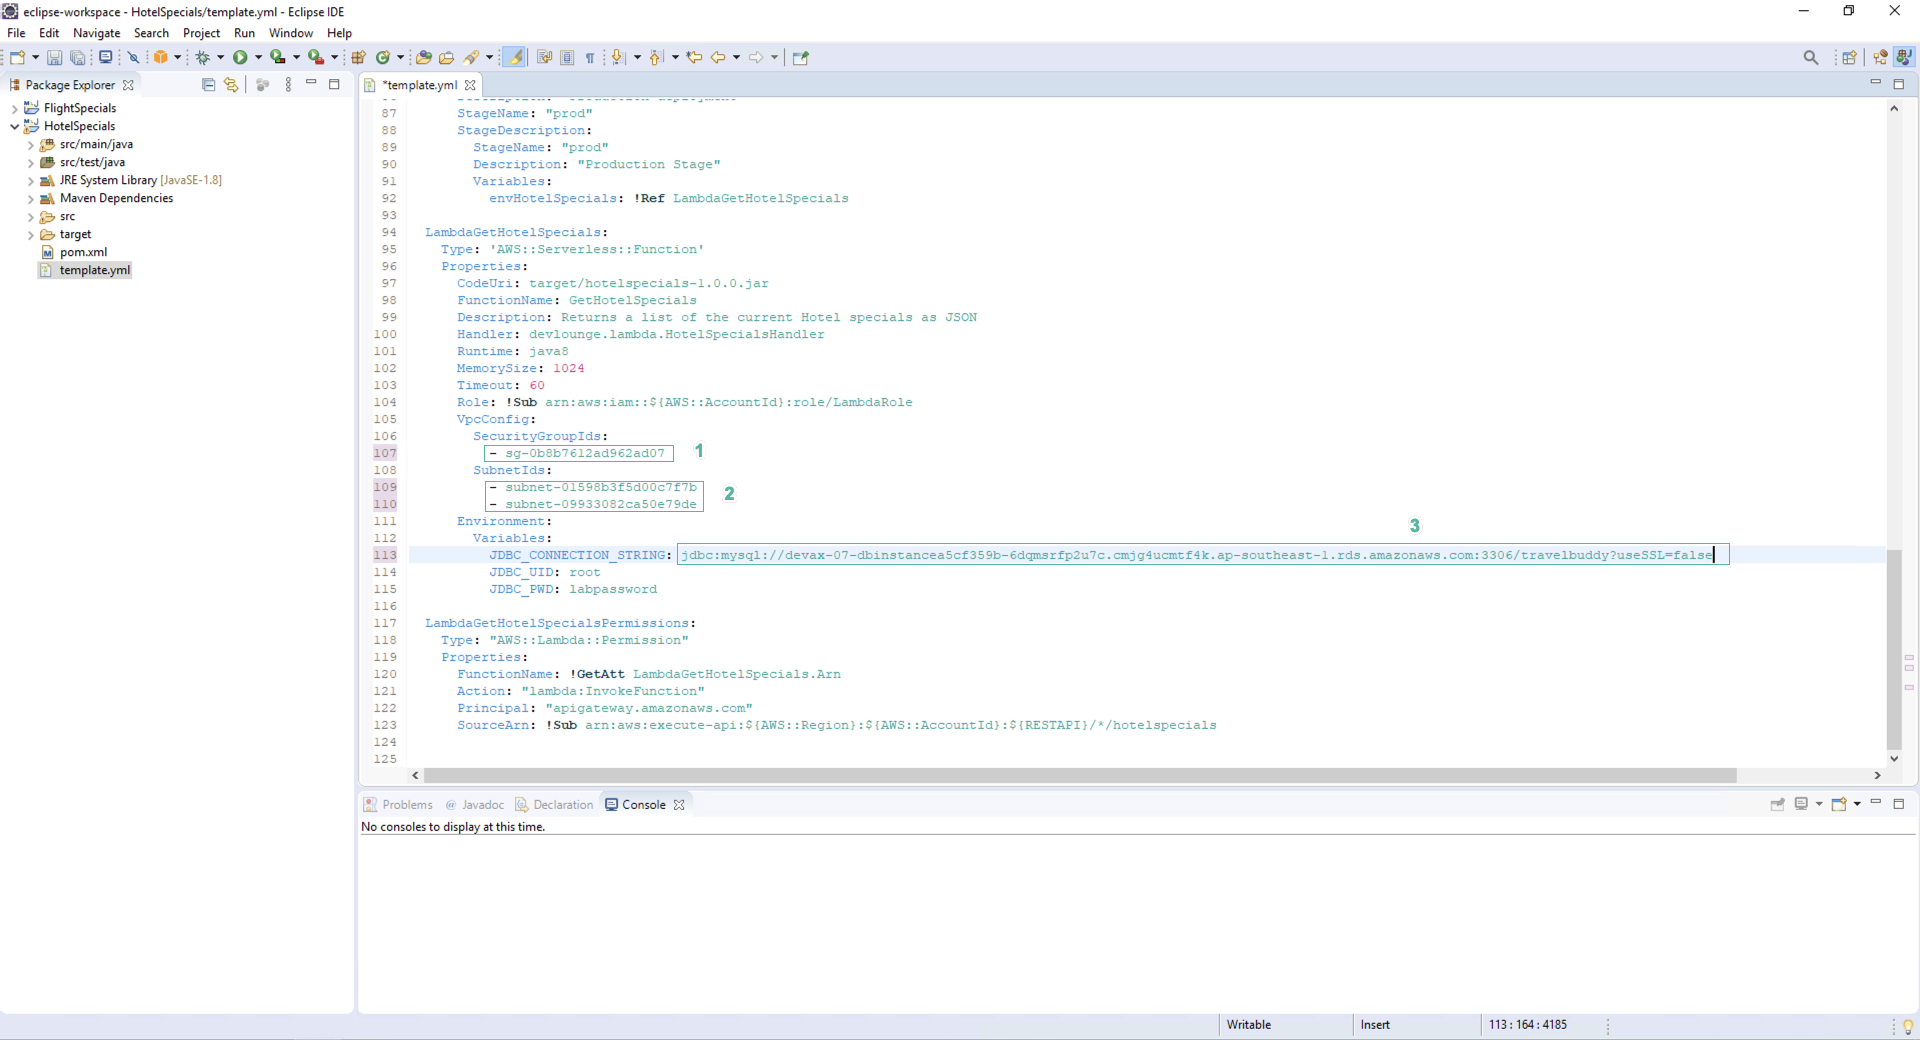
- Save file.
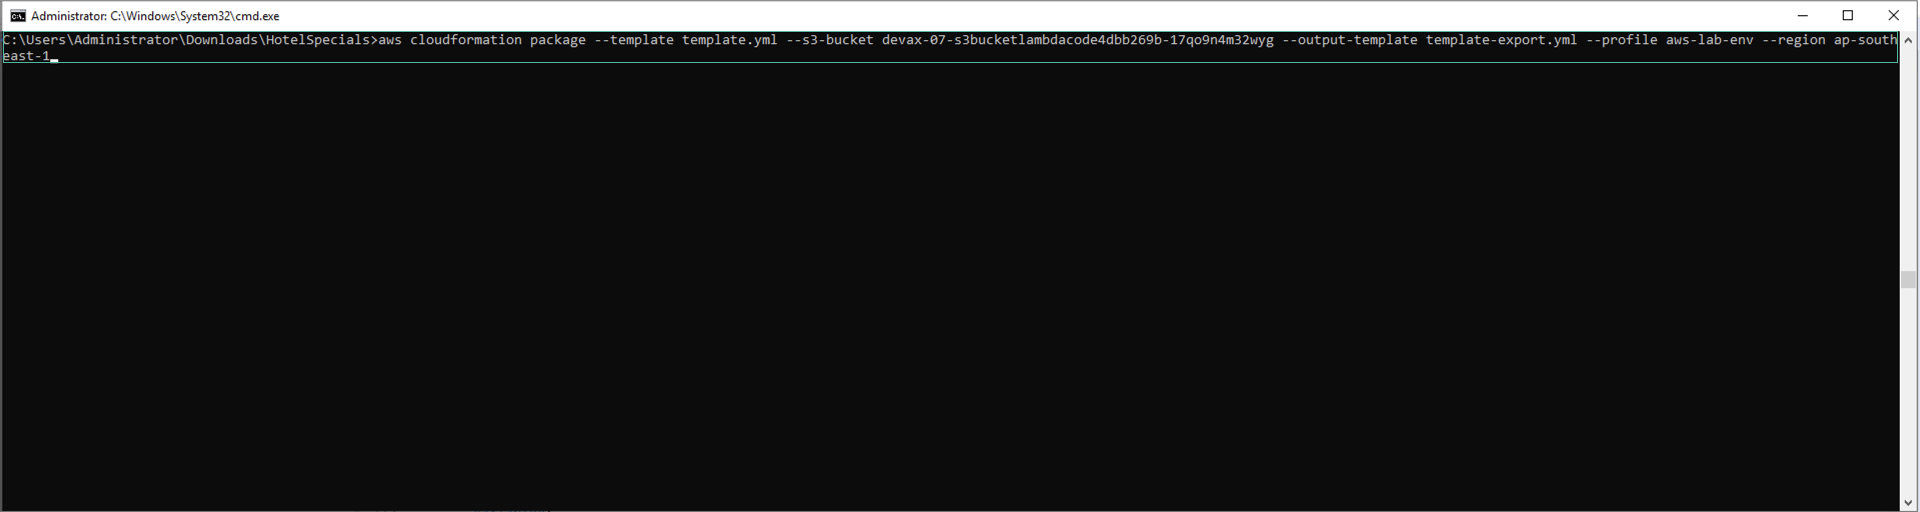
- Use the AWS CLI to package the Lambda function (from the deployment artefact you just built). Run the following command from the commandline:
aws cloudformation package --template template.yml --s3-bucket <S3BucketLambdaCode> --output-template template-export.yml --profile aws-lab-env --region us-east-1
Replace the with the value shown with the name S3 bucket already in module 6.
- Sử dụng AWS CLI để tạo và triển khai CloudFormation Change Set:
aws cloudformation deploy --template-file template-export.yml --stack-name <MICROSERVICE_NAME> --capabilities CAPABILITY_IAM --profile aws-lab-env
Thay thế <MICROSERVICE_NAME> bằng một tên phù hợp.
- When the Change Set has been executed, your HotelSpecials and/or FlightSpecials API has been deployed, depending on which one you have completed - run the steps again for the other microservice
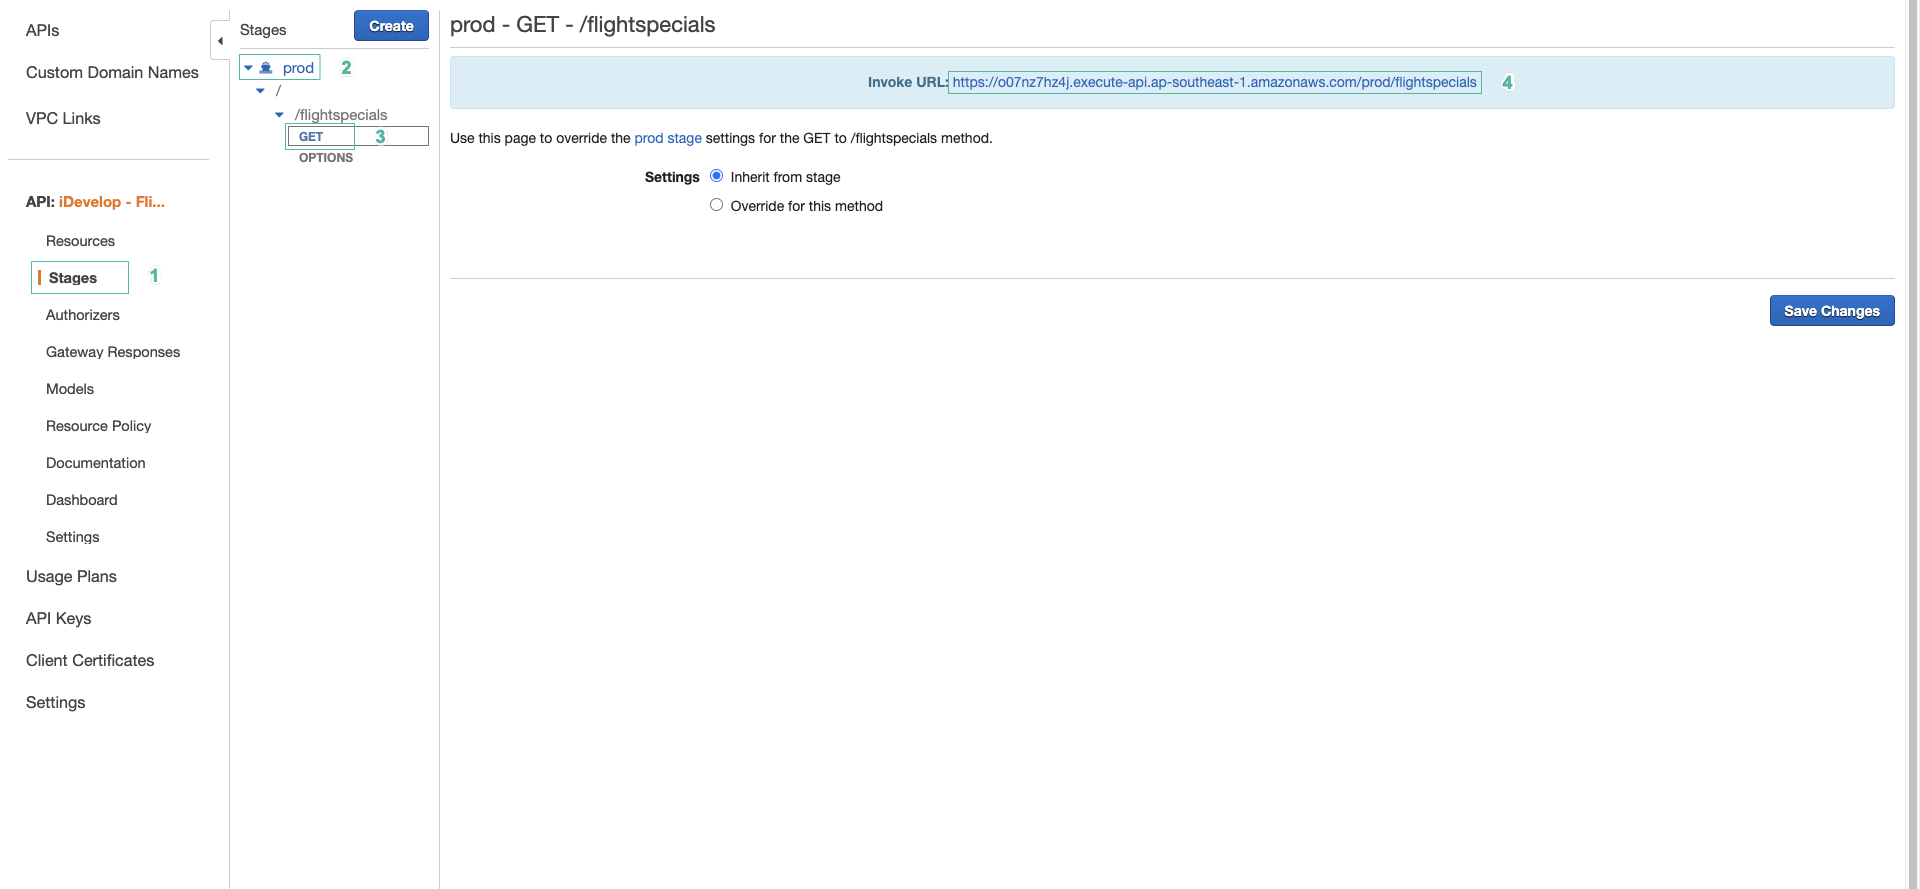
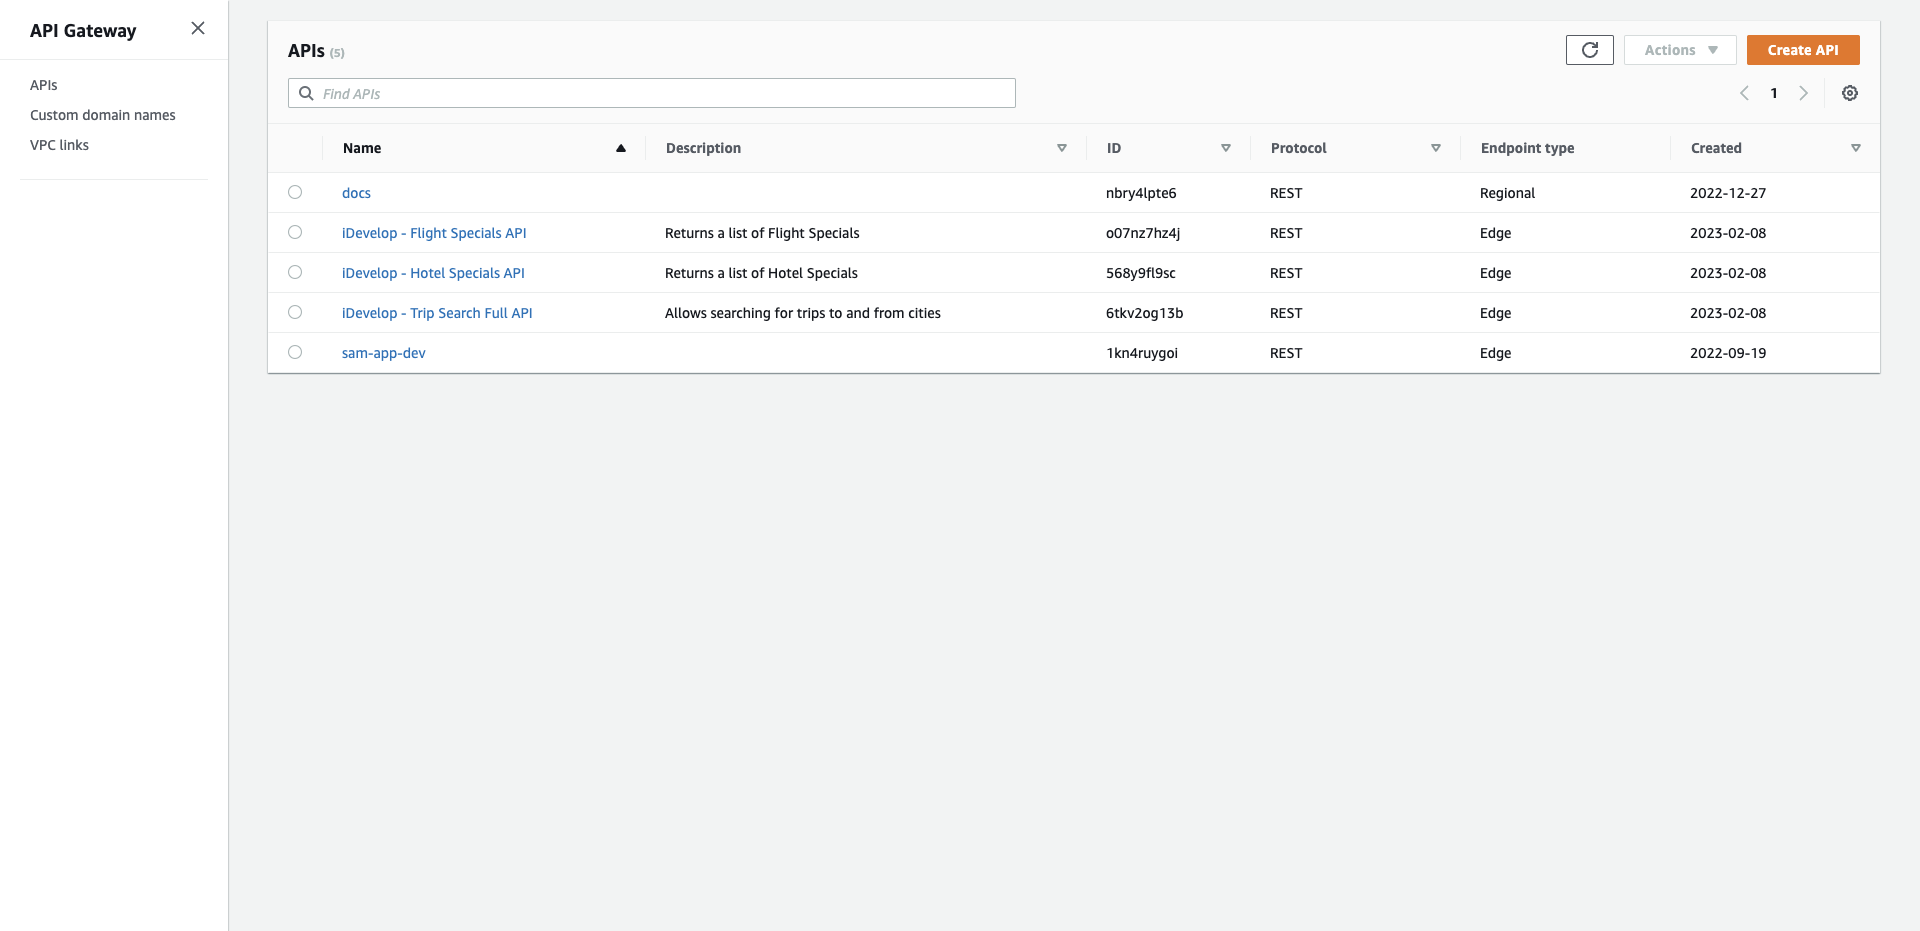
- Confirm the APIs are deployed by opening the API Gateway console, and testing the API calls by following the URL provided in the prod stage
- Click Stageslink beneath each of the APIs on the left panel
- Click prod
- Select GET method
- Click on the Invoke URL value in the prod - GET panel. After a moment while the Lambda function is initialised, you should see the JSON result of querying the MySQL database from the Lambda function.
- If you see a JSON payload with no errors, you have successfully deployed the microservice behind an API Gateway endpoint.

Be sure to repeat this process for both the HotelSpecials and FlightSpecials microservices.
For the TripSearch microservice do the following:
- Download the source code bundle from TripSearch.zip
- In a terminal window, cd into the filesystem locations where you exploded the source code, and build the deployment artefact by issuing the following command:
mvn package shade:shade
- Use the AWS CLI to package the Lambda function (from the deployment artefact you just built). Run the following command from the commandline:
aws cloudformation package --template template.yml --s3-bucket <S3BucketLambdaCode> --output-template template-export.yml --profile aws-lab-env --region us-east-1
Replace the with the value shown Cloudformation Outputs tab for the key S3BucketLambdaCodeBucketName. Do not include the < and > symbols.
- Use the AWS CLI to create and deploy a CloudFormation Change Set:
aws cloudformation deploy --template-file template-export.yml --stack-name TripSearchAPI --capabilities CAPABILITY_IAM --profile aws-lab-env --region us-east-1
- When the Change Set has been executed, your TripSearch API has been deployed. Confirm the API is functioning correctly by opening the API Gateway console, and testing the API calls by following the URL provided in the prod stage, as you did for the previous microservices.
Generate SDKs for the microservices and update the SPA source code
For each of the three APIs we have created, follow these instructions, using either the name TripSearch, HotelSpecials or FlightSpecials as appropriate. In the steps below, we refer to FlightSpecials - you need to use the right name for the API you are configuring:
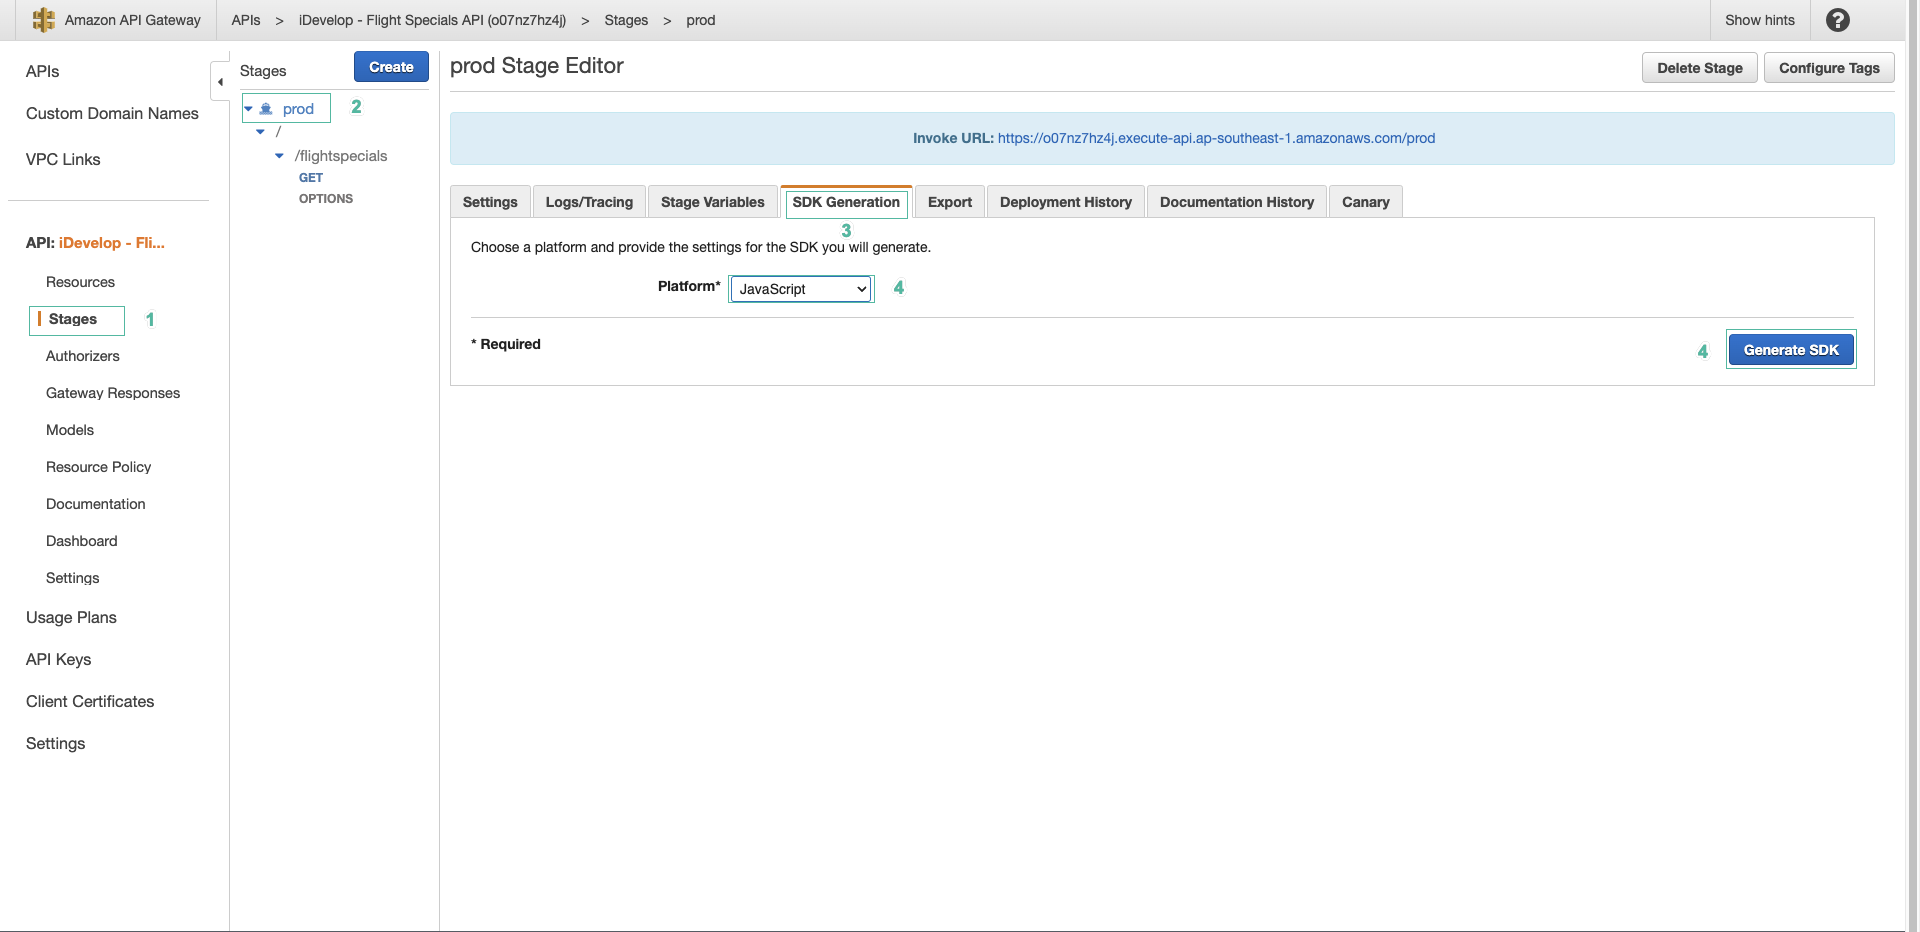
- Open the API Gateway console and select iDevelop - Flight Specials API, then select Stages
- Click prod
- Click SDK Generation
- For Platform,choose Javascipt
- Click Generate SDK. The Javascript SDK for the API will be downloaded by your browser.
- Explode the downloaded ZIP file on your filesystem, and locate the file apigClient.js
- Rename this file as
apigClient_FlightSpecials.js(orapigClient_HotelSpecials.js/apigClient_TripSearch.js) - Open the renamed file in your IDE as a text file.
- Search and Replace
apigClientFactorywithapigClientFactory_FlightSpecials(orapigClientFactory_HotelSpecials/apigClientFactory_TripSearch). There will be 2 occurrences to replace, both at the start of the file.
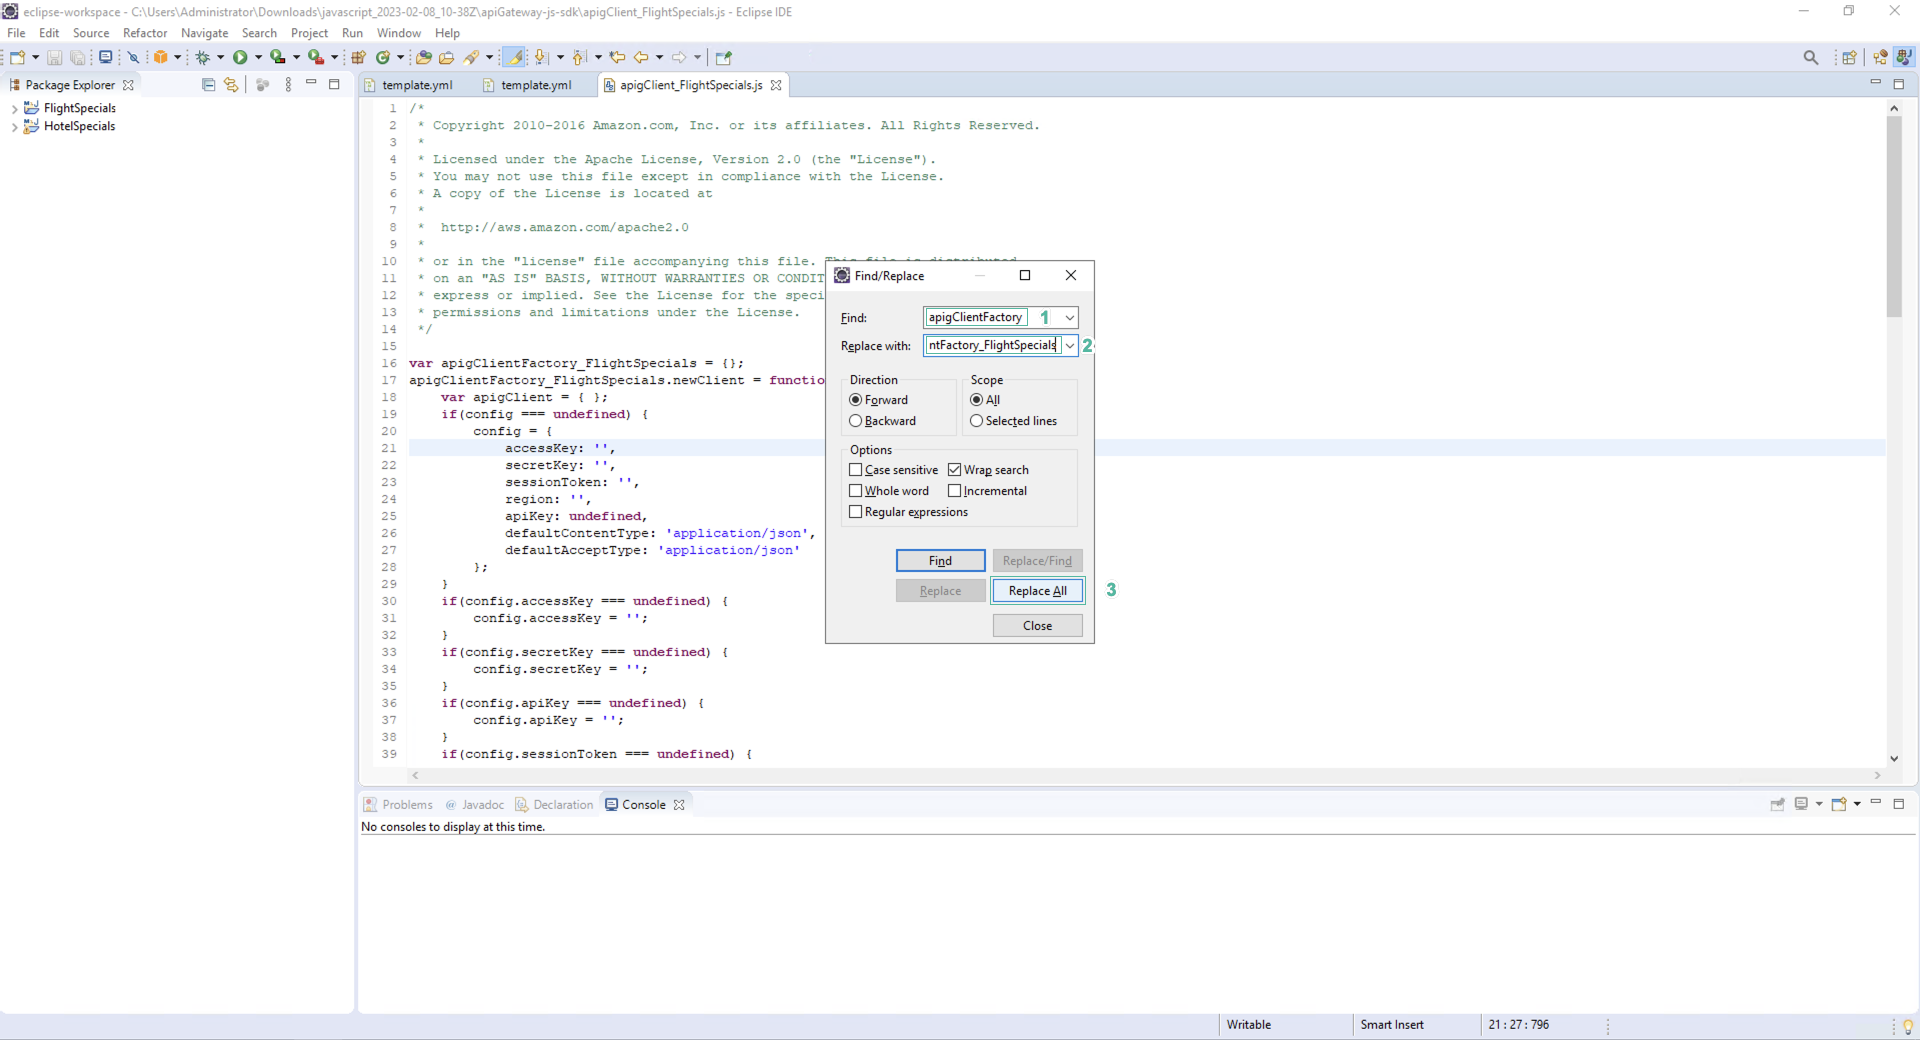
- Save the file
- At the start of this task, you downloaded the TravelBuddy.zip bundle and exploded it on to your filesystem. Copy the re-named apigClient_xxxxx.js into the /TravelBuddy/api/
Update the TravelBuddy SPA configuration to support authentication
In this exercise, you will update the configuration file for the TravelBuddy SPA, so that it can make use of the Cognito infrastructure that has been provisioned for you by the lab setup.
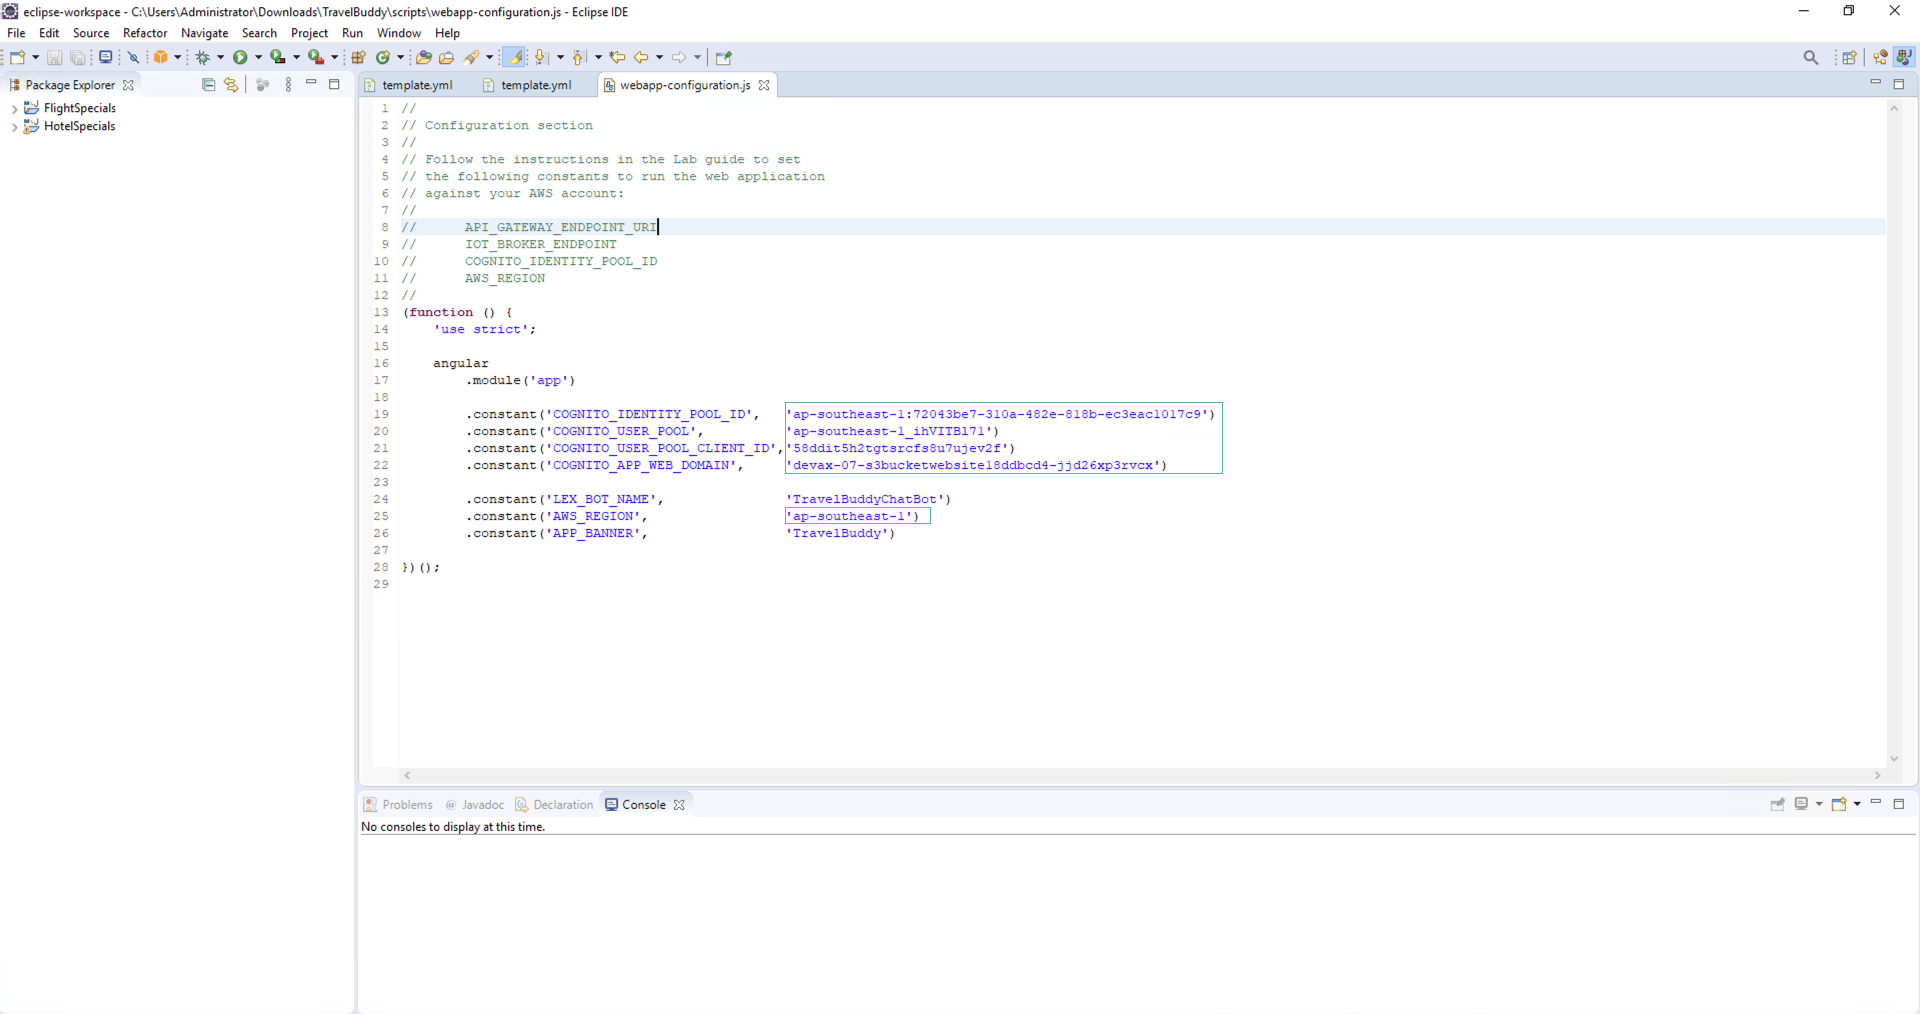
26.On your local filesystem, locate the file webapp-configuration.js into the scripts directory of the TravelBuddy web site bundle you have downloaded and exploded previously. This file has the following contents:
(function () {
  "use strict";

  angular
    .module("app")

    .constant(
      "COGNITO_IDENTITY_POOL_ID",
      "REPLACE_WITH_COGNITO_IDENTITY_POOL_ID"
    )
    .constant("COGNITO_USER_POOL", "REPLACE_WITH_COGNITO_USER_POOL")
    .constant(
      "COGNITO_USER_POOL_CLIENT_ID",
      "REPLACE_WITH_COGNITO_USER_POOL_CLIENT_ID"
    )
    .constant("COGNITO_APP_WEB_DOMAIN", "REPLACE_WITH_S3_BUCKET_WWW")

    .constant("LEX_BOT_NAME", "TravelBuddyChatBot")
    .constant("AWS_REGION", "us-east-1")
    .constant("APP_BANNER", "TravelBuddy");
})();
The SPA is implemented using the Angular framework, which allows you to define global constants that are used as configuration variables throughout your application. This file defines the values of the configuration variables that you need to set based on your AWS Account’s ARNs and Ids for the various Cognito resources. Open the webapp-configuration.js file in a text editor and change the values in the configuration file according to the table below. You can find the correct values for your lab account, Cloudformation Outputs tab in labs cloudformation:
| Placeholder name | Value to replace with from lab setup |
|---|---|
| REPLACE_WITH_COGNITO_IDENTITY_POOL_ID | CognitoIdentityPoolId |
| REPLACE_WITH_COGNITO_USER_POOL | CognitoUserPool |
| REPLACE_WITH_COGNITO_USER_POOL_CLIENT_ID | CognitoUserPoolClientId |
| REPLACE_WITH_S3_BUCKET_WWW | S3BucketWWW |
| us-east-1 | YOUR REGION |
Triển khai tập tin TravelBuddy SPA lên Amazon S3
With the API SDKs in place and the application configured to use the Amazon Cognito infrastructure, you are now ready to deploy the SPA code to the Amazon S3 Bucket that will serve the website. The lab setup process has provisioned a suitable S3 bucket, with WebSite Hosting enabled. So you will only need to push all the files from your local machine to the S3 bucket to be able to test the application.
- In a commandline terminal, cd into the directory where your working copy of the TravelBuddy SPA website is located.
- Issue the following command to synchronise between your local machine and the S3 bucket.
aws s3 sync . s3://<S3BucketWWW>/TravelBuddy --profile aws-lab-env
Replace with the S3Bucket name provided in CloudFormation Output of Moudule 6.
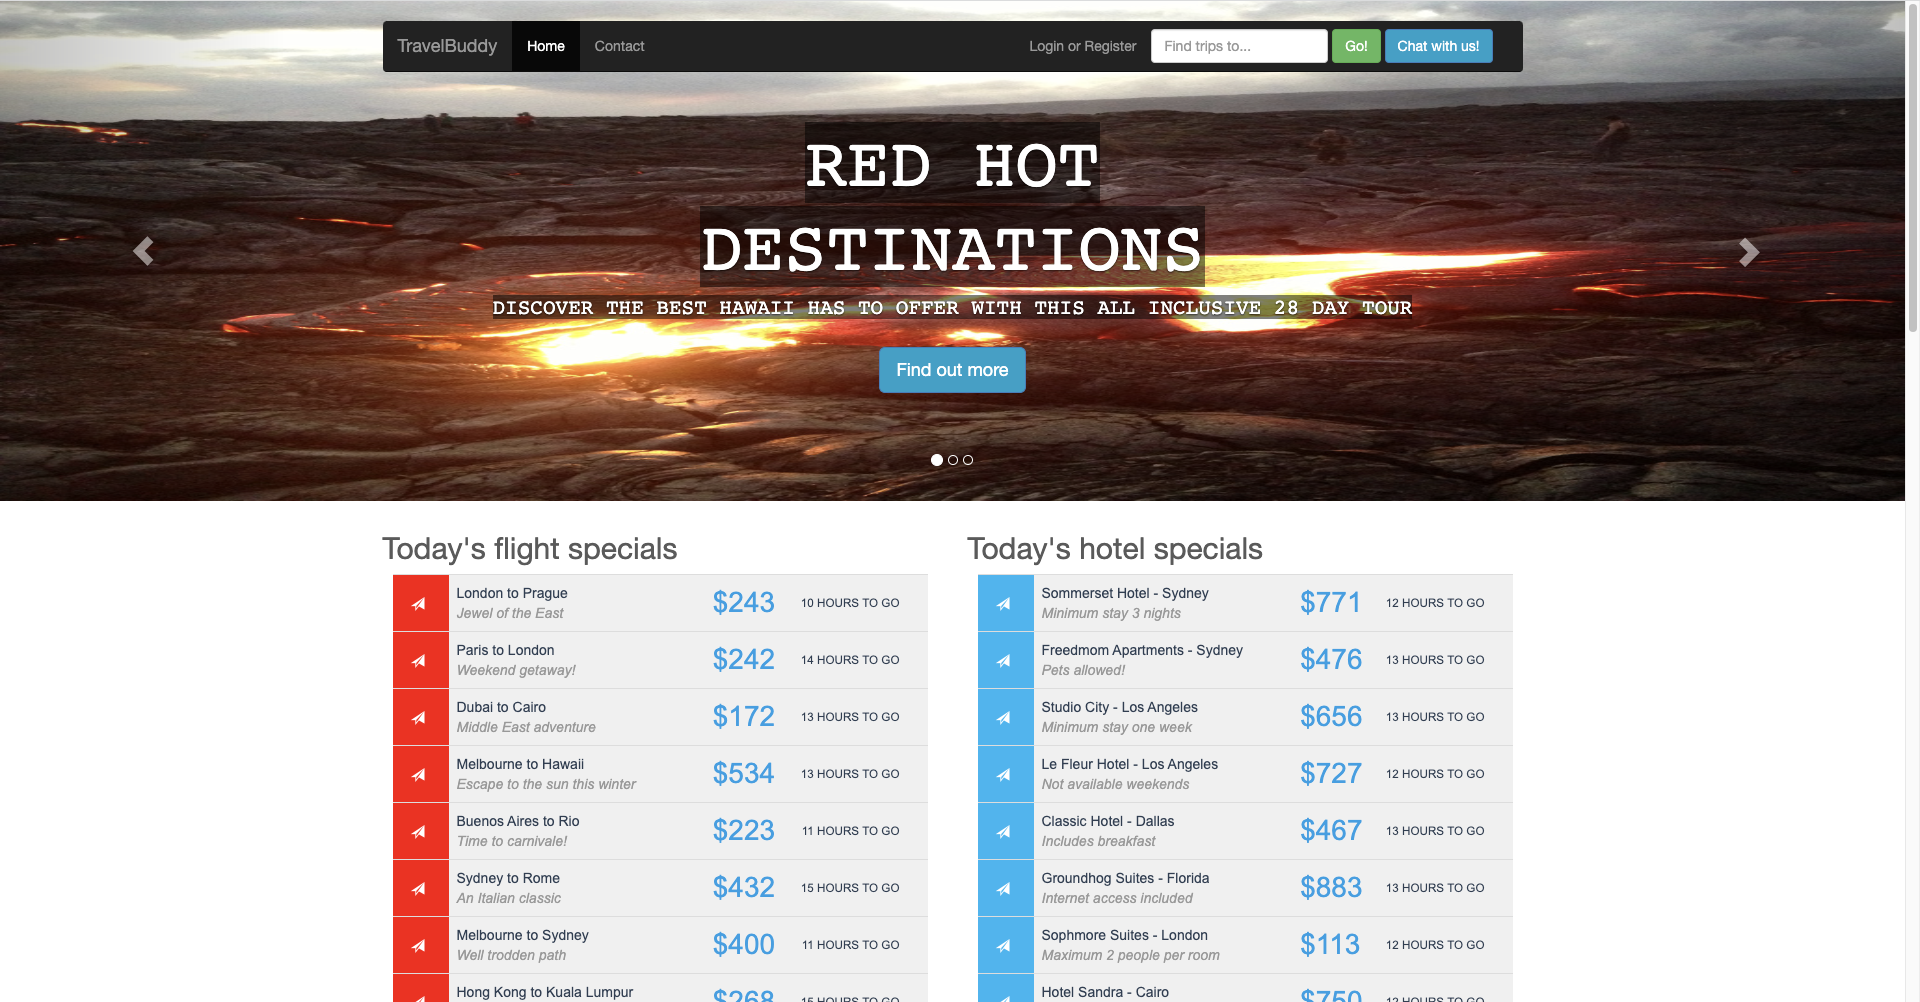
- When the synchronise has completed, you are ready to test your SPA hosted on S3. The familiar TravelBuddy website should render in your browser. You should see the Hotel Specials and Flight Specials listings rendered on the page, and the Find trips to… search option is also available. If you are not seeing the data as a result of the API calls, take a look at the developer console in the browser, to see if there are any errors that will help track down the issue.
NThere is also a new option - Chat with us! This is the UI part of the chat bot that we will implement in the following exercises.